


Welcome to my Blog
Welcome to my first blog post and the beginning of my coding journey! The first part of "Learning with Eno" explores the fundamentals of HTML and CSS.
🚨 🚨 🚨 🚨 🚨 🚨
The series "Learning with Eno" is a documentation of what I learn as I complete courses along with challenges mostly from Leon's cohort called "100Devs" but also from other sources. I blog my journey to help me revise and in the process, I wish to help people who might be in need by sharing the things I have learned!
🚨 🚨 🚨 🚨 🚨 🚨
First Step!
So, I have been learning Web Development for some time now and... it's hard.

But since I know I am not alone and many people are also learning how to code themselves, I just thought that I might as well document the things I learned! And hopefully, it can help someone along the way 😉
Most of us who are starting will be introduced to HTML and CSS before anything else. And if you are someone who starts or started with a different programming language, then kudos to you! But before we start with the basics, let me just say that I will not be going in-depth with HTML and CSS. I will mention what I believe is the most necessary aspect of each topic. Do not worry though! I will make sure to provide links to external resources to aid you in your learning!
P.S there is this joke/meme going on whether HTML is a language or not. I do not know what the deal is, but I like pineapples in my pizza. 🍍🍕 👀
HTML: HyperText Markup Language
What is HTML?
HTML or also known as HyperText Markup Language is used to create the basic structure of a web page. HTML is made up of different tags or elements. Think of it like the skeleton of the human body, without it we will all be looking like Jabba the hut. Best case scenario, a reincarnated awesome slime.
(shout out to all the tensura fans out there!)
Here an example of a HTML Anatomy:
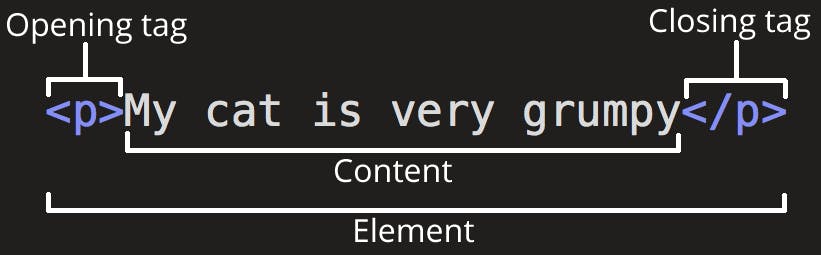
Most elements include an opening <> and a closing </> tag and the contents are usually encapsulated by the tags.
Tags

What are the most commonly used HTML tags?
There are 3 basic HTML tags that are used, which are:
<header>...</header>The header usually contains introductory information like logo, navigation menu, name, and purpose of the web page. Do not confuse this tag with theheadtag. Theheadtag has a different purpose!<main>...</main>The main sections contain the information or the main content about the site. For example, this section can include photos, info about a specific topic, links to other pages, etc...<footer>...</footer>The footer usually contains copyright information, social media links, and secondary navigation.
You can basically make a web page by just knowing these three tags and how to use them! (Although it will be pretty ugly, but its start)
I personally have 2 other tags that I use frequently in my projects, they are:
<section>...</section>I use the section tag to divide my web page into big blocks. I usually do it within the body element if there is a lot of content.<div>...</div>You will or have probably come across a div tag. I use a div tag to divide things into smaller blocks. Usually, I will encapsulate them inside my section tags, but depending on the situation div tags are very flexible so you should also familiarize yourself using them!
Other Useful Tags
Image Tag
<img src="..." alt="..." class="..." >
❗️ no closing tag❗️
atl attribute: Helpful for screen readers. This should be inside the
<img>tag and contain a short description of the image.src attribute: The path that guides the HTML to the location of the image.
Heading Tag <h1>...<h1> ~ <h6>...</h6>
Now do not be confused, but this is not the same as the header tag. The heading tag is commonly used to create a hierarchy of content on the page. Basically, they are what display the titles, sub-headings, etc. There are 6 levels starting from <h1> to <h6>. As you can guess, h1 has the biggest size and h6 is the smallest.
Paragraph Tag <p>...</p>
Paragraph tags will always display on their own line. Helps to structure the web page and combined with CSS, the styling could be applied to make the webpage visually appealing.
Anchor Tag <a>...</a>
Anything wrapped within the anchor tag will be clickable, even images. Links help connect different web pages to one another.
<a href= "https://twitter.com/codEno_12" target= "_blank" class= "social twitter">Twitter</a>
The properties
- href: The href is the path that guides the link.
- target: Having the target as "_blank" will open a new tab when the link is clicked. This enables the visitor of the page to still remain on our website whilst checking out the linked web page.
We are also able to link multiple HTML files together. This method is usually applied in the navbar, to help the users navigator through our web pages.
Navbars also known as Navigation Bars are usually made with unordered lists <ul>...</ul> and its component lists <li>...</li> (I will further explain this topic down below) combined with the <a> tag.
As an example:
<ul>
    <li>Home</li>
    <li><a href="/moreinfo.html" target="_blank" >Learn More</a></li>
</ul>
Now when we click to learn more in our navbar or in the list where we have our lear more. It will automatically jump to the moreinfo.html page. The target attribute is optional, but I personally almost always use it when I build projects. It's better to get used to it now than later!
Ordered / Unordered Lists
ordered
<ol>
<li></li>
<li></li>
<ol>

unordered
<ul>
<li></li>
<li></li>
<ul>
Ordered Lists
<ol>...</ol>: As clear as it sounds, it's a list that is in order. They are automatically numbered e.g. 1, 2,3...Unordered Lists
<ul>...</ul>: For items that do not need to be in order.Lists
<li>...</li>: Lists are usually nested inside ordered or unordered lists. They are the items or contents of the<ol>and<ul>.
If you want to learn more about the different type of tags and their purpose check out this link
👉 →→ javatpoint.com/html-tags#:~:text=HTML%20tag... ←←👈
We just got a step closer to becoming better web developers!

CSS: Cascading Style Sheet
What is CSS?
Cascading Style Sheet allows us to implement different styles, layouts, and etc.. to our web page. Basically, this is the fashion industry of web development.
 ↑ 🙄 Literally me trying to use CSS...
Here is an example:
h1 {
    color: red;
    font-size: 5em;
}
🧱 A block of CSS is called a CSS Rule
Syntax
- Selector /
h1: Each rule begins with a selector. The element selector, in specific, will style all h1 in our webpage { } - curly braces
- color: / font-size: - property
red; / 5em; - value
The property and values are nested within the curly braces. Make sure to not forget : after each property and ; after each value❗️
Linking CSS to HTML
How to apply CSS?
Well, we need to first look at our index.html file. Within the head element, we want to link our CSS:
<link rel="stylesheet" href="styles.css">
With our CSS linked to the HTML file, any modifications/adjustments/styling done in CSS will show up on our web page!
Make sure you have the right path file! If you are not sure how to achieve that here is an article that might help you!
👉 →→w3schools.com/html/html_filepaths.asp ←←👈
Selectors
With our CSS linked with our HTML, we can now move on to style our web page using selectors. There are 3 basic selectors in CSS
Type Selector:
- Type selectors are selected using the element tags in the HTML.
h1 ,a ,img , body , header , etc..
h1 {
font-size: 1500px;
}
Class Selector:
.combined with class name is used to specify that we are using a class selector. The class name depends on you, so make sure you use one that makes sense..nav ,.location , .title , and etc..
.title {
color: orange;
}
ID Selector:
#combined with the "id" is used to specify that we are using an id selector.#username,#password ,#email,and etc..
#email {
font-family: Roboto;
}
And another 3 for the more advanced skill level
Universal Selector:
*is used to indicate that we are using the universal selector. This selects everything, and when I mean everything, I mean everything.
* {
color: blue;
}
This will turn all the fonts to the color blue. However, if we use a more specified selector like type, class, or id we can over-write the dictated value.
Grouping Selector:
- As the name indicates it's a selector which are in groups.
h1, p, a {
font-size: 18px;
color: orange;
}
Type Class Selector:
- Probably the most specific selector out of all. This will select the type element with the specified class
p.center { text-align: center; color: red; }<p>elements with the class center will be aligned in the center and colored red.
Specificity
- Depending on what you are doing, you might end up having multiple styles for a single element or class along the way. Depending on the specificity you apply, the style that will be presented will vary.
This is how I view the specificity order:
Universal < Group < Type < Class < ID < Type Class
Here is an article if you want to know more about specificity:
👉 →→w3schools.com/css/css_specificity.asp ←←👈
Styling HTML can be very fun. Make sure you know when to use the different types of selectors and name your classes that make sense!
✨✨Now are ready to do makeovers on them outdated-looking web pages✨✨

That's all everyone! We got the basics of HTML and CSS. I hope I did not bore you while reading this blog post...

We Made It

That is it for this week's learning with Eno! Make sure to practice, practice, and practice! Learning by doing is the best way to learn.
Lastly, I just want to remind you that these are just the basics and there are many more materials to learn to improve your development skills. I hope that this blog post helped you one way or another.
If you have any feedback on how I can improve my blog post or anything in general please let me know. Anything is welcome as long as you deliver the message with kindness!
Also, I would love to see how your coding journey is or what it was was like and how you tackle projects, time management, etc. Learning how to code is very challenging but you are not alone so let's link up on social media 😉
Social Media Links
Twitter: twitter.com/codEno_12
Github: github.com/codEno12
Linkedin: linkedin.com/in/eno-jose-a154b522a
I just realize I gotta clean my Github account 😂 Have a great day and keep coding!
Other Blog Post
Next up is JavaScript Simplified 1, stay tuned! Cya!